7 Easy Steps to Calculate Your Azure Pricing (Using the Azure Pricing Calculator)

Mastering Cloud Expense Management with Microsoft Azure’s Essential Tool
If you are considering migrating to Microsoft Azure or already managing workloads in the cloud, one of your top priorities is understanding and forecasting costs. Cloud pricing can be complex, but Microsoft provides the Azure Pricing Calculator—a free, web-based tool—to help estimate and manage your cloud budget. In this extensive guide, we’ll walk you through everything you need to know about the Azure Pricing Calculator, including a step-by-step tutorial, best practices, and tips for maximizing its value.

Why Use the Azure Pricing Calculator?

Budgeting and forecasting cloud expenses are critical for both IT teams and business managers. The Azure Pricing Calculator provides a transparent, customizable way to estimate the costs associated with Azure resources before you deploy them. Whether planning a proof-of-concept or scaling a production environment, the calculator helps answer: “How much will this cost me?”
Benefits include:
  • Transparency: See upfront costs for every Azure service.
  • Customization: Configure resources based on your actual needs, not generic templates.
  • Comparison: Experiment with different setups and regions to find the most cost-effective approach.
  • Exportability: Share estimates with your team or management in various formats.

Getting Started: Accessing the Azure Pricing Calculator

To use the calculator:

Step-by-Step Guide: Using the Azure Pricing Calculator

Let’s break down the process into manageable steps:

Step 1: Navigating the Interface

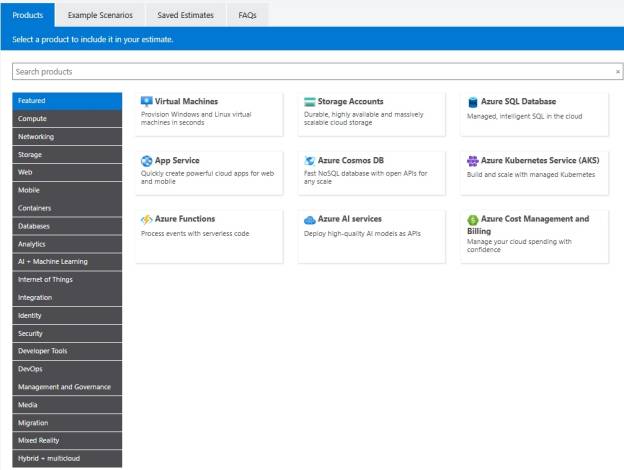
When you open the calculator, you’ll see a clean interface with a search bar and a categorized list of Azure products.
  • Browse or Search for Services: Use the search box or scroll through categories (Compute, Databases, Storage, etc.) to find the Azure resources you want to estimate. For example, to price a Virtual Machine, type “Virtual Machine” and select it.

Step 2: Adding a Product to Your Estimate

After selecting a service (e.g., Virtual Machines), it will appear in the estimate pane below. This is where you’ll configure specifics.
  • Configure Region

Azure pricing varies by location due to local infrastructure and energy costs. Choose your region (e.g., East US, West Europe) for an accurate estimate.

  • Select Options: Each product has configurable parameters. For a Virtual Machine, these might include:
    • Operating System (Windows/Linux)
    • Instance Tier (Basic/Standard, etc.)
    • VM Series and Size (e.g., D2s v3)
    • Number of Instances
    • Hours per Month (e.g., always on or only certain hours)
  • Licensing Options(e.g., including or excluding software licenses)

Step 3: Adding and Configuring Additional Services

Most real-world workloads include more than just virtual machines. You can add multiple services to the same estimate, such as:
  • Storage Accounts
  • SQL Databases
  • Load Balancers
  • App Services
Configure each service in detail, adjusting the parameters relevant to your use case.

Step 4: Reviewing and Adjusting Your Estimate

As you add services, the calculator totals your estimated monthly cost at the bottom of the screen. Each component is listed with its individual cost and configuration summary.
Tips:
  • Rename line items for clarity (e.g., “Production VM,” “Dev DB”).
  • Duplicate items to try out variations (e.g., different VM sizes).
  • Use the “Show Dev/Test Pricing” option for non-production workloads if available.

Step 5: Understanding Price Breakdown

Expand each line item for a detailed cost breakdown. You’ll see how each option (e.g., storage type, backup, bandwidth) affects your total.
Example Snippet:
Virtual Machine:
– D2s v3, 2 vCPUs, 8GB RAM
– OS: Windows
– 1 Instance, 730 hours/month
– $70.08/month

Step 6: Exporting and Saving Estimates

When your estimate is complete:
  • Click “Export” to download as Excel or PDF for sharing or documentation.
  • If signed in, click “Save” to store estimates in your Azure account for future reference.
  • Use “Share” to generate a link you can send to stakeholders.

Step 7: Updating and Comparing Estimates

Cloud pricing can change, and so can your requirements. To keep estimates relevant:
  • Revisit saved estimates to update quantities or options.
  • Make copies of estimates to compare scenarios side-by-side (e.g., different regions or storage types).

Advanced Functionality & Best Practices

Incorporating Reserved Instances and Savings Plans

Azure offers discounts for one- or three-year commitments (Reserved Instances) and flexible savings plans. The calculator allows you to select these options to see potential cost reductions.
Example:
  • Select “1 Year Reserved” or “3 Year Reserved” for VMs to see larger discounts compared to pay-as-you-go pricing.
  • Try the “Savings Plan” for even more flexible options.

Factoring in Additional Costs

Remember, not every cost is obvious! Consider:
  • Data transfer/bandwidth fees between Azure regions or outside Azure.
  • Backup and disaster recovery services.
  • Support plans (Basic is free, but Standard and higher are paid).
  • Licensing for Windows Server, SQL Server, or other Microsoft software.

Using Cost Management and Billing Tools

The calculator is for planning, but once deployed, use Azure Cost Management & Billing to monitor and adjust actual spending. Pairing both tools gives you full control over your cloud budget.

Tips for Accurate Azure Pricing Estimates

  • Specify realistic usage patterns: Don’t just accept defaults—estimate hours/month, expected data traffic, and storage growth.
  • Use tags and line-item notes: Label resources in the calculator like you would in the portal for easier mapping.
  • Consult with Azure Sales or Support: For complex architectures, Microsoft representatives can help validate your estimates.
  • Stay updated: Azure pricing and services evolve rapidly. Always start with a fresh estimate for new projects.

Frequently Asked Questions

Q1: Is the Azure Pricing Calculator free?
Yes, the tool is entirely free to use and does not require an Azure subscription.
Q2: Does the calculator show actual billing prices?
Estimates are based on the latest published rates in the selected region, but your actual bill may vary based on special offers, contracts, or usage nuances.
Q3:Can I use the calculator for hybrid or multi-cloud scenarios?
The calculator is focused on Azure-only services. For hybrid scenarios (Azure + on-premises), you may need additional planning.

Conclusion

The Azure Pricing Calculator is an indispensable tool for anyone planning to use Microsoft’s cloud services. With its user-friendly interface and granular configuration options, it empowers you to understand, forecast, and optimize your Azure spending before you deploy. By following the step-by-step instructions in this blog, you’ll be able to build accurate, shareable estimates for any Azure project—from simple websites to enterprise-scale deployments.

Recent Posts

Latest Blogs

Join Us on the Journey to Transforming Futures - Contact Us!

Schedule a meeting with our experts or fill out the form for a free assessment of your environment today!

*Cloud 9 reserves the right for free
assessment eligibility.